
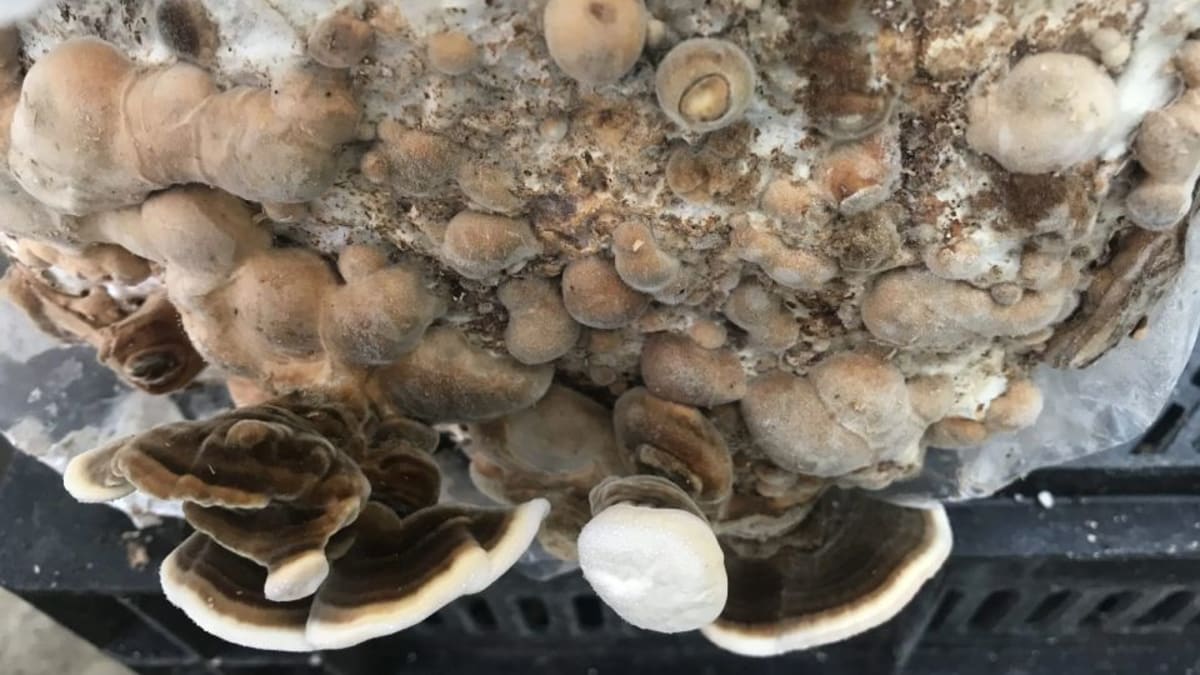
We grow turkey tail mushrooms at home by either inoculating hardwood sawdust blocks indoors or drilling plug spawn directly into fresh-cut logs. Sawdust blocks take about two to four months to flush. Logs take up to a year. This wood-decaying fungus (Trametes versicolor) needs dense shade and steady moisture to actually push out caps. We track the latest cultivation trials to nail down the precise temperature windows and substrate mixtures that produce the heaviest yields.
A 2021 study in the Journal of Applied Biology and Biotechnology found that supplementing standard hardwood sawdust with wheat bran and rice husk increases the final fruiting body weight by feeding the mycelium a higher concentration of available nitrogen. Cellulose and lignin are what the fungus eats. It breaks these tough plant walls down into polysaccharopeptides like PSK and PSP. Taking this whole operation indoors gives us total command over the humidity levels and fresh air exchange. We also avoid the gnats and aggressive wild molds that plague outdoor setups. But outdoor log cultivation requires almost zero daily upkeep and pushes out seasonal harvests for years on end. Over two full growing seasons, we tested both paths to find out what actually works from spawn to jar. The 2021 trial recorded a 45 percent jump in biological efficiency when adding that extra bran.
Key Takeaways
- 1Sawdust blocks colonize in 4-6 weeks indoors and fruit in 3-5 weeks more; outdoor logs take 8-12 months but produce seasonal flushes for up to 4 years
- 2A 5:1 sawdust-to-wheat-bran substrate ratio boosts biological efficiency by 45% - confirmed by 2021 trial data
- 3Pressure-sterilize at 15 PSI for 2.5 full hours - turkey tail mycelium grows too slowly to outcompete wild mold in a merely pasteurized block
- 4Harvest and dehydrate immediately at 115°F - leaving fresh caps on the counter for even one afternoon invites bacterial degradation
What You Need
Getting a healthy flush requires sterile materials and tight climate controls. We split our equipment list into four distinct categories.
Substrate and Spawn
We use hardwood sawdust as the foundation for our indoor blocks. Oak and maple run best. Pine suppresses fungal growth. Adding a nitrogen boost like wheat bran or rice bran is what bumps up the final harvest weight. We toss in one percent calcium carbonate to buffer the acidity. A 2023 study published in Maximum Academic Press demonstrated that adjusting the moisture of the substrate to field capacity and buffering the acidity to a pH between 6.0 and 8.0 maximizes the vegetative mycelial growth for this wood-decaying species. Get pure grain spawn from a lab that tests for contamination. A single contaminated grain ruins the whole block.
Sterilization Equipment
Strict hygiene dictates indoor success. A massive pressure cooker is absolutely non-negotiable for cooking the sawdust blocks. The method requires those thick polypropylene mushroom bags with the little micron filter patches to hold the wet wood. Seventy percent isopropyl alcohol handles all the surface sanitation. Put on nitrile gloves to keep skin oils off the sterile medium. Setting up a still air box prevents airborne green mold spores from infiltrating and completely trashing the block before our slow-growing turkey tail mycelium has enough time to establish a dominant foothold in the wood. A single mold spore ruins the whole bag.
Fruiting Chamber Supplies
The organism needs tight climate control to actually pin. A large clear plastic storage tote makes an excellent automated fruiting chamber. Grab a fine-mist spray bottle for the plastic walls. A cheap digital hygrometer tracks the baseline internal moisture. Wire up a small computer fan to handle the fresh air exchange. Because turkey tail caps require massive oxygenation to form those classic flat rosettes, the exhaust fan routinely removes the thick layer of carbon dioxide that naturally pools at the bottom of the bin during respiration. The fan runs for five minutes every four hours.
Harvest and Processing Tools
Use a sterile scalpel. It slices the tough fruiting bodies right off the plastic. A dedicated food dehydrator locks in the compounds. Stash the dried pieces in airtight glass mason jars. A commercial coffee grinder pulverizes the leathery caps into a usable dust. Since this fungus develops a rigid chitin cellular wall that resists breaking down in the human digestive tract, we must crush the dried pieces into a micro-powder to prep the material for a proper hot water extraction. Standard blenders stall out on the raw caps.
Step-by-Step Cultivation Process
Cultivation runs on a set timeline of prep, inoculation, incubation, and fruiting. We outline the indoor sawdust block method below. It gets you to harvest faster. While jamming plugs into outdoor logs offers a beautiful hands-off approach to growing medicinal mushrooms, mastering the indoor bag method gives us absolute control over the environmental parameters needed to force a massive flush. The indoor cycle wraps up in ninety days.
Step 1 - Mix the Substrate
Mix dry hardwood sawdust with wheat bran at a strict five to one ratio. Pour in water until the pile hits field capacity. Test this by grabbing a handful of the wet dust and squeezing hard. A few drops should trickle out. The batch is flooded if water streams from your clenched fist. Standing water drowns the fungal tissue. Bone-dry pockets stall the run. Hitting that perfect hydration sweet spot lets the vegetative mycelium tear through the dense wood matrix without slamming into dry dead zones that halt cellular expansion or anaerobic puddles that breed sour rot.
Step 2 - Pack and Sterilize
Scoop the wet substrate mixture straight into the polypropylene grow bags. Fold the plastic tops tightly inward. Stack the bags inside the pressure cooker. Run the heat at 15 PSI for a full two and a half hours. Let the metal pot cool completely to room temperature before you crack the lid. Always wait out this agonizing cooling phase because dropping delicate grain spawn onto a sawdust block that still holds core heat above eighty degrees Fahrenheit will instantly boil the living fungal tissue alive.
Step 3 - Inoculate the Bags
Carry the chilled bags into a draft-free room. Scrub down every inch of the counter and your hands with the rubbing alcohol. Rip open the top of one bag. Dump in roughly a half cup of the colonized grain spawn. Seal the plastic back up instantly using an impulse sealer or industrial duct tape. Shake the whole bag violently to bounce the grains through the sawdust. Smashing the clumps of grain spawn and scattering them evenly throughout the sterile substrate creates thousands of separate inoculation points, and those extra jump-off points drastically shorten the colonization timeline so competing molds never get a chance to take root.
Step 4 - Incubate the Mycelium
Stash the sealed bags in a dark closet. Keep the ambient room temperature hovering between 65°F and 75°F. Stark white mycelium starts crawling across the loose sawdust within a few days. Leave the bags alone for four to six weeks. The block reaches full colonization when the entire mass shifts to solid white and binds together into a hard brick. It feels dense at this point. Inspect the plastic weekly to verify the spreading network stays bright white, since a sudden burst of forest green or black means a catastrophic contamination breach occurred. Throw the whole bag straight into the dumpster.
Step 5 - Initiate Fruiting
Haul the solid blocks into an automated fruiting chamber and give them indirect natural daylight for roughly twelve hours a day, which triggers the tightly bound mycelium to abandon vegetative expansion and start pushing out actual mushrooms. Slice a single four-inch horizontal line across the front of the plastic bag. The caps form directly on this cut line. Fresh air hits the mycelium here. Mist the plastic walls of the tote twice a day to lock the humidity at 85 percent.
Step 6 - Harvest and Dehydrate
The mushrooms hit maturity when the caps fan out flat and the tiny white pores underneath look highly defined. This usually takes three to five weeks from the day we cut the plastic. Carve the clusters off flush against the hard block using a scalpel. Throw the fresh harvest into a dehydrator immediately. Do not wait around. A 2022 MDPI paper on extraction methods shows that excessive heat damages delicate polysaccharides. Run the dehydrator at 115°F for 24 hours to protect the medicinal compounds. Leaving a harvested cluster sitting on the kitchen counter for even a single afternoon invites aggressive bacterial degradation and fuzzy mold growth, so we transfer the living tissue straight from the growing block into the moving air of the machine. The final moisture content needs to hit zero.
Outdoor Log Cultivation Alternative
Outdoor log growing plays the long game. It skips the lab equipment. Source freshly dropped oak branches measuring about three feet long and six inches thick. Drill deep half-inch holes every few inches down the bark. Hammer wooden dowels colonized with turkey tail mycelium into each cavity. Paint the insertion points with melted beeswax. The wax traps the internal moisture and blocks wild fungi from hijacking the wood. Keep them in total shade.
Drag the logs into a fully shaded corner of the yard. Keep the wood up off the raw dirt by resting inoculated logs on a wooden pallet or a loose bed of gravel. Soak the bark deeply with a hose during dry summer spells so the core stays damp. The mycelium spends the next eight to twelve months slowly eating the internal hardwood structure. It kicks out recurring flushes of colored mushrooms every single autumn for up to four years after that first plug goes in. The sharp seasonal drop in temperature combined with heavy autumn rains naturally triggers the fruiting cycle. 24 months is the peak yield window.
Common Mistakes
First-time cultivators usually crash and burn from poor moisture control or choked air exchange. The leathery texture tricks people into assuming the growing process is bulletproof. We watch folks make the same predictable errors over and over.
Skipping the big pressure cooker guarantees total failure because turkey tail mycelium crawls way too slowly to outcompete wild mold in a merely pasteurized substrate. Dumping boiling water over sawdust works fine for fast-growing oyster mushrooms. Absolute sterilization is required for these nutrient-dense blocks. Vicious green mold will overrun the bag in a matter of days if even a trace of bacteria survives the heat. Sterilization is not optional.
Stagnant air causes deformed alien fruiting bodies. Because this specific wood-decaying fungus demands intense oxygen levels to spread out into those beautiful flat caps, the mushrooms will mutate into weird coral-like fingers if thick carbon dioxide pools in the bottom of the chamber from poor ventilation. The box needs a fresh air flush at least three times a day. Just program a tiny computer fan to run for five minutes every few hours.
Waiting too long to harvest degrades the tissue. The vivid colored bands fade out the second the fruiting body dumps its spore load. Green algae actually starts colonizing the tops of over-mature caps in these high-humidity environments. Pull the clusters the very day the outer white margin stops expanding outward.
Baking the mushrooms in a kitchen oven destroys the medicinal value. Turkey tail compounds break down fast under high sustained heat when there is no water present to protect them. An oven set to the lowest warming dial still runs way too hot for safe dehydration. Invest in a cheap food dehydrator with a digital temperature read. The machine has to pull out every drop of internal moisture to stop the stored harvest from rotting inside the mason jar. A crisp snap tells you they are done.
Extraction and Preparation Strategies
Growing the caps is barely half the battle. The human digestive tract completely fails to break down the rigid chitin cell walls of raw turkey tail. Extract the active compounds using a long hot water steep. Eating them raw just triggers severe stomach cramps and offers zero medicinal effect.
Toss the bone-dry caps into a commercial coffee grinder. The blades chew them into powder. A 2022 MDPI study noted that prolonged boiling water extraction pulls the water-soluble polysaccharopeptides out of the fibrous matrix, though adding a splash of lemon juice to lower the acidity can help break down the chitin walls even faster. Simmer the dust in a crockpot full of water for anywhere from twelve to twenty-four hours. Strain the sludge out.
The resulting black liquid holds the beta-glucans. Drink this dark decoction hot or freeze it into ice cube trays for long-term dosing. Some folks run a secondary alcohol soak on the leftover sludge to pull out the non-water-soluble triterpenes. We prioritize the long hot water method because the primary immune-supporting compounds in turkey tail are water-soluble polysaccharides. Throw away the spent mushroom dust since the long boil strips out all the target nutrients anyway. Our full guide on how to dry turkey tail mushrooms walks through dehydration and storage step by step.
Frequently Asked Questions

A dedicated wellness researcher who spent decades cataloging the impact of forest-based nutrition on human aging. Ashley doesn't care about trends; she cares about the data.